
Decals Application Guide
This page provides full details for how to apply my decals to your models. A printed summary of these instructions will be included with your first order. Both versions can be downloaded in PDF form, for you to refer to offline, or print out:
The Decals
Unlike many mass-produced decals, in which the carrier film onto which the decal itself is printed only extends for a small distance around the edge of each decal, the carrier film of Aardstorm Models decal sheets extends across the whole sheet. You will therefore have to cut the film around each decal during application.
For transparent-backed decals, this is not critical as any excess film will be almost invisible once in place on your model, and it is therefore largely a matter of personal preference how close you cut around the decals.
For white-backed decals, however, any excess film will be visible as a white border around the decal. You therefore have to cut accurately around the edge of each decal. To help with this, Aardstorm Models decals either incorporate a printed background colour that matches a specified paint colour, in which case they can be cut in a similar manner to the transparent-backed ones (just make sure you cut within the printed background), or are provided with a small border the same colour as the adjacent part of the decal and cutting guides (small lines around the decal edges) to show exactly where to cut. Typical decals with cutting guides and a black background are shown below.
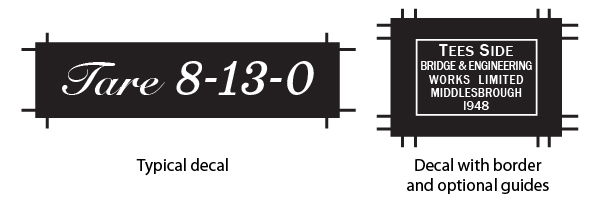
Where decals such as these have been provided with a background colour intended to match that of the surrounding surface, the white decal edge, although very thin because it is only the thickness of the carrier film, can sometimes be noticeable, especially where the background colour is dark. This is easily hidden by carefully painting over the edge of the decal with the background paint colour, but a margin has to be allowed for this when cutting out the decal. For decals with a background colour the cutting guides are normally set to give a small border of the background colour around the decal for this purpose.
The decal on the right has a white border, to simulate a cast plate. Additional, optional cutting guides are provided, aligned with the edges of the plate border. You therefore have a choice whether to cut along the edges of the plate, and hopefully remove the need for touching-up, or to keep a border of background colour for touching-up in the usual way.
Unfortunately the cutting guides only work with straight decal edges, for curved edges you will have to carefully follow the outline of the decal. Where a decal is white to its edge, a black line is provided to define the edge of the decal; this has to be cut off completely. With care, gentle curves can generally be followed fairly easily freehand; tighter curves are generally best cut as a series of frequently-spaced tangent lines. Ideally, find a suitable round object to act as a template to guide the knife.
Tools
Tools I have found useful for applying my decals are:
- Knive(s). As a minimum, a straight-edged knife with a fine point is essential. The knife should be good and sharp (e.g. use a fresh blade). Should you need to cut decals when wet, additional knives with round blades, of small and large radius, can be useful.
- Cutting mat. A good quality, clean mat large enough to support a complete sheet of decals. If you don't have a proper cutting mat, thick(ish) card can be used, but you will need to rotate or replace the card frequently to avoid the risk of old cuts deflecting the knife blade.
- Straight edge. A good quality straight edge, such as a ruler, is essential to guide the knife during cutting. Metal is best, to minimise the risk of the blade digging into the straight edge and damaging it. It should be long enough to at least span the width of the decal sheet.
- Tweezers. For handling the decals once cut from the sheet, and retrieving them from the water.
- Saucer, or other shallow container, to hold the water for releasing the decals from the backing paper. The container will need to be large enough to hold the largest decal flat. The water should ideally be room temperature, rather than straight from the cold tap.
- Decal setting and/or softening liquid, to help the decals follow surface features. Use in accordance with the manufacturer's instructions.
- Rubber tools. These are for pushing the decal around on the model. I have a set of tools with soft rubber tips of various shapes and sizes. I forget where I got them from, but I think they were intended for pushing paint around on a canvas, so may be found in an art or craft shop. Alternatively, pencils with an eraser on the end an do a similar job. The eraser should be clean, and it can be useful to have several whittled to different shapes: conical, rounded, and chisel-edged are the most useful shapes. Block type erasers, shaped in a similar manner, can provide larger versions.
- One or more old (but clean) paintbrushes with the bristles cut short to a few mm in length to stiffen them. Brushes of size 0 to 2 are most useful, or flat one of a similar size. The bristles can be used end-on to push the edge of a decal, or they can be used to smooth out bubbles or creases. Also useful for wetting a decal during application, and/or applying decal setting/softening liquid.
- Wooden cocktail sticks. Also for pushing a decal around, and helping it into recessed surface features. The working end should be blunted: try tapping it on a hard surface a few times, or for a more sophisticated approach, cut the tip off and round off the remaining end with a file or abrasive paper.
- Magnifying glass(es). To help see fine detail and help with accurate positioning of the decals on your model. Can be hand-held, supported on some sort of moveable arm, or worn as spectacles, according to your preference.
- Kitchen paper towels, ideally of the sort that retain their strength when wet. Folded over several times to form a soft pad. Press onto the decal once in position to help dry it, and persuade it to follow surface details.
- Blu-tak and/or masking tape to help support the model while you are working on it.
- A good working light, ideally adjustable for position and angle, to help you see what you're doing clearly.
Preparation
The model should have been painted, at least for the major areas and where the decals are to be applied. The model is best not varnished at this stage, unless the paint you've used is exceptionally matt and has a rough finish. This is to facilitate blending of the decals background with the surrounding paint finish; a layer of varnish may hinder this. A gloss or satin paint finish is best to improve adhesion of the decals, especially if the decals are transparent-backed, to minimise the risk of "silvering" caused by air being trapped under the transparent part of the decals. The latter is not a problem for white-backed decals with a background colour incorporated into them. The paint should be allowed to dry thoroughly before applying decals.
At times you will need to use both hands to manipulate your decals, so it helps to support your model, with the side you are working on facing up, in such a way that it doesn't move around on your desk or workbench too easily. Blu-tak and/or masking tape can be used to temporarily fix your model to your desk, or even better, to a non-slip mat (e.g. a second cutting mat) or block of wood so that you can easily change your working angle.
Application Sequence
For most of my decals, the following sequnce of application is recommended.
Step 1
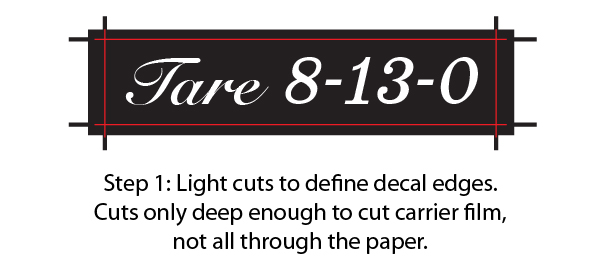
The first step is to define the size and shape of the decal. Using the tip of a sharp knife, make light cuts around the edge of the decal, as shown in red on the right. These should only penetrate the thin carrier film, not go all through the paper.
To use the cutting guides, position your straight edge against the edge of the chosen guide on the decal side. This helps to protect the fragile ink layer at the edge of the decal. The cutting guides are normally 0.25mm thick, so if your knife blade is of similar thickness, and the cutting edge is in the centre of its thickness, the cut should follow the centre of the guide.
Where guides cross at a corner, extend the cuts a little way beyond the intersecting guide, to make sure the corner of the decal is cut cleanly.
Where ink is printed right up to the edge of a decal, it is very vulnerable to damage during this cutting operation and can easily tear and lift off the carrier film, leaving an unsightly ragged white edge to the decal. The risk of this happening can be minimised by using a very sharp knife (a scalpel with a fresh blade is ideal) and making the light cuts specified above.
Where an edge of a decal has to be curved, normal cutting guides aren't much use. You will therefore have to carefully cut along the edge of the decal freehand. A blade with a fine point will also help to avoid damaging the edge of the decal when the knife is twisted to follow the curve.
You may also be able to find a suitable curved object to act as a template to guide the knife. Again, where possible position it on the decal side of the cut. For curves of larger radius, a circle drawing template that consists of a number of discs of different, defined radius may be of use, as would a set of french curves or a flexible curve-drawing guide, especially for non-circular cuts.
For small radius curves (too small for a template), making a series of short tangential cuts can be effective.
Step 2
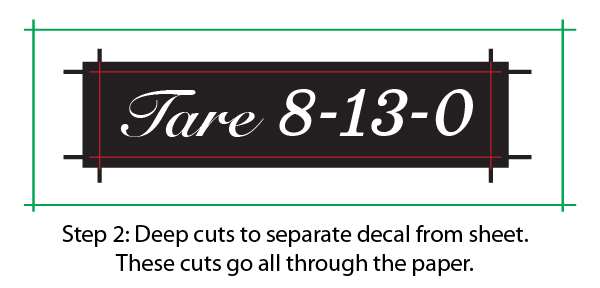
The next step is to separate your chosen decals from the rest of the sheet. This time make the cuts deep enough to go all the way through the paper. Make the cuts a little way out from the edges of the decal, as shown in green, perhaps half-way between the chosen decal and its neighbours on the sheet.
Step 3
The next step is to separate the carrier film from the backing paper. Place the decal in water so that the entire decal is submerged. Hold it there until the decal slides easily over the paper. 15 seconds is often sufficient for small decals while larger ones can take 45 seconds or more to release. It is particularly important to soak larger decals well as the carrier film is quite stretchy, resulting in a distorted (or even broken) decal if it doesn't slide off the paper easily. Whether the decal has released can be tested by removing it from the water and gently try to slide it using your fingers. If it doesn't move easily across its whole area, put it back in the water for a little longer.
Step 4
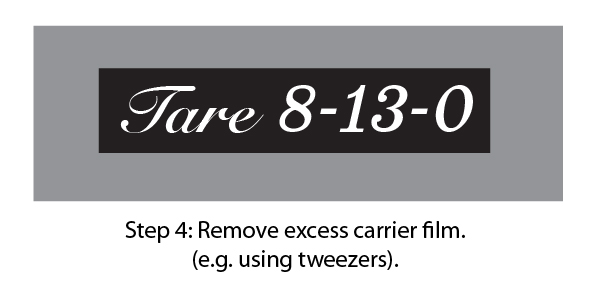
Once the decal has released, shake off excess water and remove the excess carrier film around the edges of the decal itself (shown in grey), for example by pinching it with tweezers. This creates a convenient “handle” with which to hold the decal without touching the surface of the wanted decal area.
Step 5
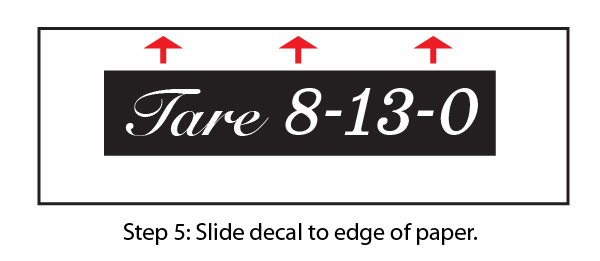
Carefully slide the decal so that it projects a little over one edge of the paper.
Step 6
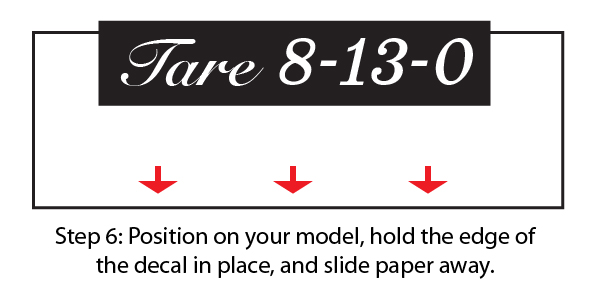
Position this part of the decal in its correct place on your model and gently hold it in place (e.g. with a small paintbrush with short bristles, rubber-tipped tools, or even your fingers). Then carefully slide the backing paper away from under the decal.
Step 7
The final position of the decal can then be adjusted by gently pushing or dragging it around with a small brush, rubber-tipped tools, or your fingers. Be careful with this, as the decal is very fragile at this stage. If it's reluctant to move, further water can be added to help it slide. If you need to do a lot of re-wetting, try picking up some of the adhesive from the discarded backing paper with a wet brush.
Once in position, dab off excess water with a soft lint-free cloth or paper towel folded on itsself several times to create a "pad", taking care to avoid moving the decal. Applying vertical pressurewith the pad, rubber-tipped tools, or your fingers can help the decal follow small bumps, ridges or hollows on your model's surface, and remove any air bubbles. A commercial decal fixing/softening fluid can also be useful for this.
Larger raised or recessed features may need more work to get the decal to sit on your model properly:
- For larger rivet or bolt heads it can help to prick the decal with the tip of your knife, or possibly cut a small cross in the decal using a knife with a small round blade: rock the knife backwards and forwards gently to make the cuts, don't drag the knife across the decal. This should allow the decal to spread around the raised feature. The resulting gap in the decal will need to be touched-up with paint once dry.
- A chisel-edged rubber tool, or a wooden cocktail stick used side-on, can be used to press the decal into a raised corner, or into long recesses such as simulated planking joints.
- A pointed rubber tool, or the end of a blunted cocktail stick, can be used to press the decal into small recesses. Again, pricking the decal with the tip of your knife, or making a small cross cut, will help spread the decal into the recess.
- If you find the need to make longer cuts in a decal while wet, use a vertical chopping action, don't drag the knife across the decal. For example, use a knife with a round blade and rock it backwards and forwards along the cut, repeating at intervals until the complete cut is made.
Step 8
Repeat steps 1 to 7 for any other decals to be applied to the same model, then allow the decal(s) to dry throughly, at least overnight.
Step 9
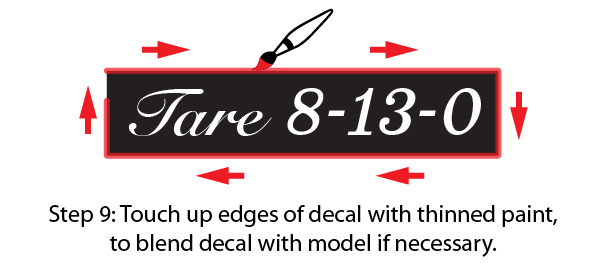
For those decals with a background colour that is to match the paint of your model where it is applied using a small, good quality paintbrush, carefully paint around the edges of the decal to tint the white edge of the carrier film (as shown in red for clarity) and help blend the colours of the decal and model is there is a slight mismatch. You should use the same paint that you used on your model in this area, thinned sufficiently to allow it to flow off the brush easily. If necessary, repeat with more coats, allowing each coat of paint to dry.
As shown, the paint should generally overlap both the edge of the decal and the surround paint on your model. With a steady hand, a tiny brush and good (magnified) eyesight, you could alternatively try to apply paint only to the white edge of the decal.
Step 10
Finally, allow the decals and paint to dry at least overnight, then apply a coat of varnish or lacquer to protect your decals from subsequent handling or moisture. Your model is now finished!
Special Cases
The above covers application of most of my decals. However, there are a number of special cases that require extra attention:
Wagon Sides
My decals for private owner and other wagons are designed to completely cover the wagon sides (and sometimes the ends too), except perhaps for the ironwork at the corners. The resulting decals are therefore quite large, especially in the larger scales, making them tricky to handle once wet.
The ironwork often found on the sides of wagons could cause problems with the sit of the decals on the side of your model, again especially in the larger scales. It all depends how thickly the ironwork has been implemented on your model. Getting the decal to wrap around ironwork will effectively shorten and/or distort it. Ironwork in the form of thin, flat strips shouldn't be too much of a problem in the smaller scales. Ironwork in the form of 'L' or 'T' sections will almost certainly be a problem even in the smaller scales. In these cases, the decals will need to be cut to allow the raised rib to project through the decal. If such ironwork extends for most or all of the height of the wagon side, it will probably better to cut the decal into sections and apply them separately.
The decals are difficult to cut cleanly once wet, so the cuts should be made before soaking the decals in water. To help with cutting the decals around ironwork, cutting guides are provided around the edges of the decal to mark the likely positions of the ironwork. The positions of planking joints are similarly marked. You won't need to use all of the guides; it is up to you to choose which (if any) you need to use. The guides have been positioned according to drawings or photos for the appropriate prototype (or for customised decals, photos you provide of your actual model). Their positions may therefore not match the corresponding features on your model. For those guides you want to use, check their positions against your model before making the cuts, and adjust the guide positions if necessary, e.g. by making pencil marks.
For 'L' section ironwork, you may only need to make one cut, along the side of the strip with the raised rib. Similarly, 'T' section ironwork may only need to be cut down its centreline. However, if the flat part of the ironwork is too thick to allow the decals to sit properly, you may need to cut along both sides of the strip. This is also true of flat ironwork in the larger scales.
Such cuts will leave gaps between adjacent parts of the decal, requiring more touching-up of the decal edges. On the prototype, lettering is generally arranged to avoid raised ironwork, but this is not always the case. Where lettering crosses a gap in the decal coverage because of ironwork, you will need to fill in the gap between the two parts of the decal with appropriate paint: use paint that matches the lettering colours in the decal as closely as possible, perhaps mixing a small quantity if you can't find a matching standard paint colour.
If you do try to fit the decal as a complete side, perhaps as an experiment using a spare decal to find out which ironwork is going to cause problems, start by aligning a long edge with the top or bottom of your wagon side, making sure to position it centrally. Carefully slide the backing paper away while holding the edge of the decal in place in several places. Then work outwards from the centre of your wagon pressing the decal down, removing any bubbles and creases, and tucking it around raised ironwork or into planking recesses using suitable tools (see Step 7 above). If this results in a satisfactory fit of the decal to your model, that's great, repeat for the other side. If not, it will probably be better to remove the decal and replace it with another copy with appropriate cuts (or even cut into separate sections) to avoid problem ironwork, as described above.
Lining and Pinstripes
Decals for lining and pinstripes are particularly long compared to their width, making them tricky to handle. The obvious way to apply them is to slide the backing paper away lengthwise while holding one end in position. However, this runs the risk of stretching the decal excessively, perhaps even breaking it.
It will therefore be better to slide the decal off the paper sideways, gently pushing the decal off the paper and into place with a brush, rubber tools, or your fingers.
This will inevitably result in a wiggly line. The edge of the backing paper can help straighten the decal out, to an initial extent, by gently pushing it against the edges of the decal. After that, hold your model to look along the line of the decal at a shallow angle. This will make any remaining wiggles more obvious. Straighten the decal by gently pushing it sideways in appropriate places using a short-bristled brush or rubber tools. Repeat until the lining is straight to your satisfaction.
Window Labels
Decals for window labels come in two distinct types:
- On white-backed paper to be applied to the outside of the window. These will need to be cut accurately to shape.
- On transparent paper with reversed decal pattern, to be applied to the inside of the window. Accurate cutting out is less critical.
It will not be possible to touch-up the edges of the white-backed decals, so if the label is not white at its edges the white edge of the carrier film will be visible.
Once the transparent decals have been applied and allowed to dry it will be necessary to carefully paint the back of the decals with white paint. Keeping the paint within the confines of the decal pattern will be tricky!
An alternative that I haven't yet tried is to apply white-backed decals to the back of transparent ones. This should be easier than painting, but runs the risk of the second layer of decals disturbing the adhesion of the first.